Cutting Ceramic Tile and
Ceramic Tile Cutter
Cutting ceramic tile isn't as hard as you may think, but you have to have the right tool for the job. The proper ceramic tile cutter is essential to make clean cuts without wasting your time, and money, on tiles that did not break as planned.
First lets discuss the different tile cutters you should have for any tile installation. Be sure to wear eye protection and gloves with any of these cutters because chipped glazing is very sharp and can really do some damage to your eyes and hands.
The Score and Break Type of Cutter
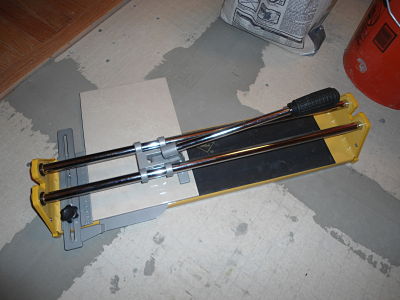
Cutting ceramic tile is easiest on this style of cutter. This style of ceramic tile cutter is used to make straight cuts the length of the tile. These really save a lot of time because most of the cuts you will make will be straight cuts, and this makes it fast and easy.
Be sure to read the box to make sure the tile cutter you're considering will cut the tile you're looking to buy. Most of the score and break tile cutters will cut up to 1/2 inch thick tile, which is pretty heavy duty tile as most tile is 1/4 thick. Also these cutters are only for ceramic and porcelain tile, not stone.
For
cutting of the same size tile most of these style cutters have a
stop you can position at the correct length. This is a very nice
feature that saves a lot of time. These can be bought at any home
improvement center or you can get a NATTCO
18" Snap Tile Cutter will Steel Base
through Amazon.com.
Cutting ceramic tile on this type of cutter is very easy. There is a tungsten carbide wheel that simple scores the glaze to give the tile a weak point. Just run the wheel over the tile with firm even pressure the length of the tile, don't press down too hard when scoring the tile, then press down with the feet to break the tile.
A
Score and Break Tile Cutter

The Wetsaw
A tile wetsaw is just that, a diamond cutting blade that is immersed in water to keep it cool. So with this style of cutter you will need lots of water, as well as rags to dry the tile after cutting ceramic tile.
These are very easy to use, simply mark the cut, turn on the saw and wait for it to come up to speed and slowly feed the tile into the blade. Making sure there is enough water to keep the blade cool. Most tile wetsaws have a water level indicator.
I only use wetsaws to cut around corners, and other irregular shapes that cannot be done the score and break cutter. Not because they don't work, but because it takes so much longer to do cut the tile this way. You have set up the saw outdoors, put water in the tray, then you have to walk outdoors to cut the tile, dry it off, then walk all the way back inside to check the fit. If it doesn't fit correctly guess what? Yup, you're going back outdoors and cutting ceramic tile again.
Don't get me wrong these cutters have their place but it's much easier to use these only when necessary. There are also two types of these ceramic tile cutters. Ceramic tile cutting can be done on a professional style wetsaw that can be rented for say $40 a day.
Or you could buy a homeowners
model for around $60 and have it for a
long time. A Homeowner
Wet Saw
from Amazon is a good choice. I have personally owned one of these for
many years and it gets plenty of use. I have had to change the blade
twice now, and for how many tiles it's cut that's not too shabby. Plus
it's very light in weight which makes it very easy to carry.
A homeowner model saw can also
fit into a shower, so if you want to cut
indoors it's possible. Keep in mind these tile saws do spray a lot of
water, so keep the guard in place to contain it. I'm
sorry I don't have
a picture of my wetsaw but it is well worn, just shows how much it's
been used. It has been cutting ceramic tile for a long time.
Tile Nippers
I
gotta tell you, I'm not a fan of these cutters. They often break the
tile irregularly, and sometimes they break the tile in half. They also
send shards of very sharp glazing flying. The key to
using nippers is to
take small bites.
I would only recommend these cutters to those who have some experience with ceramic tile. The reason for that is you have to know what will be covered up by trim, or a fixture to hide the ragged edge these cutters leave.
Drilling Ceramic Tile
It may be necessary to drill ceramic tile while installing it. It's very easy to do if you take your time.First thing is you need a drill with a masonry bit in the size you need. The masonry bit is hardened with carbide to take the stress of drilling through such a hard material.
After you mark where the hole is to be drilled simple take the bit and tap it with a hammer very, very lightly to chip the glaze a bit to prevent the bit from walking all over the tile.
Next drill your hole. It's that easy. The key is to lightly tap the bit with a hammer to chip the tile a little. Don't whack the bit with sharps blows as this will damage the bit and also potentially crack the tile. If you prefer you can use a nail or a nailset to chip the glazing it's your choice.
Drilling ceramic tile can be done before or after the tile is installed.


